THE VESPA

This is my 72 Vespa, I absolutely love this scooter. This was my first restoration, and I bought it from a bloke I know. As my garage leaked like a sieve this project was done in my Dads garage and as it happens I think he quite enjoyed it and even got his hands mucky.

 Here it is delivered to the house in bits. The front fork and headset taken out for some reason, I can only think to fit it in a car for its journey from Italy to the UK. Not keen on the original colour so that had to be changed.

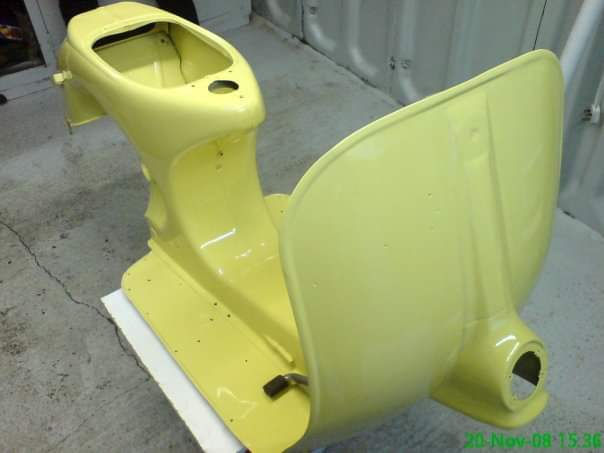
 In My uncle Dave's spray shop. All rubbed down and primered. It's good having people you know with the right tools and knowhow.

 I couldnt for the love of God get the rear brake pedal off so it was masked up and sprayed whilst in situ. Everything else was removed. The colour I went for is lovely although the lights in my Dads garage bring out a bright yellow when in fact it is more pastel.

 So I'm starting to get the trim on at this point including the original spare wheel holder which are a bit rare around these parts. The floor rubbers were a real chore to get in the channels. I have since learned a lesson around soaking them in warm water for a few mins to assist in this task. As well as that fitting the wiring loom under the bridge piece of the floor tunnel was a little testing to say the least. I had to squash the loom flat to get it under the strenthening plate within the bridge of the frame. Nightmare!

 The cables were also threaded through the scoot and the headset to loosely fit. The fork has been rebuilt and a nice stiffer chrome spring fitted along with a new shock absorber. As it did not come with a front hub, a new one of those and bearings to compliment were added. The good thing about a rebuild is that it should be all clean so no dirty hands, it's a pleasure really assembling the parts that came in the post.

Looking good.

 The eagal eyed amongst you will see that the engine has crept into the bike as well as new brake levers and a horn. I have stayed 6V on this as I wanted to keep most things original.

 So the engine is a 3 port 125cc engine. It is 6V and I have done nothing with it other than clean it with a jet wash, take off the head to inspect the bore and piston and put back together, change the plug and oil and put it back in the scooter. The hope is that it will run and I can determine if anything is wrong at that point. As not knowing the history of the scoot I dont know of any previous repairs.

Rear light assembly.

Not far off trying to get it running, I checked for a spark and there was one. Fingers crossed.

 Would you Adam and Eve it, after not many kicks and some priming with fuel it only went and started up. As you can see the fuel tank has been installed along with the side panels, lights, hand grips and stand. The speedo is installed also and it is nearly a complete bike. Need some seats. Dad liked giving it a rev as he is not a bike man and I think this was a little new to him.

Well look at that, it's 95% finished. Some leg shield trim required and a longer brake cable, as when I brake and the susspension compresses it pulls harder on the brake causing it to anchor on. Put some leather washers under the two front mudguard screws to protect the paint

 Happy days, ( although I'm trying to look cool and trying to avoid my mate Shedy in the middle of the road ). Runs like a dream straight away with only minor fiddling of the carb. The scooter has flown the nest from Dads garage and is happy at home at mine now.

It's a thing of beauty and that scooter is damn nice as well.

 Complete and very happy with it. It was a real nice thing to do with my Dad and we had some giggles along the way and I'm pretty sure I taught him some stuff too.

 After about 2 years with this scoot the engine started playing up and not starting and running correctly. As well as that I had a couple of kids so it didnt get much love. I got the scoot bug back and took the plunge into refurbing the engine myself. It was not hard but the correct tools are essential. I replaced the points and condensor and all the seals bearings and gaskets. I renewed the piston rings and honed the barrel and left it standard, other than a sip road 2 exhaust and a slight upjet. The result was a perfectly running scoot that starts from cold predictably on the 3rd kick every time, and from warm on the 1st.

 Picture from 2019

March 2021

 Installation of a 150cc cylinder.

 Thinking I needed a little more ummph up the hills I sourced a brand new cylinder, cylinder head, and gaskets from people on the forumns I am a member of. I already had a 20/20 carb to upgrade from the 20/17 currently installed. 

Firstly disconect the scooter wiring harness from the junction box, you can see I have done some repairs in here before. When you put it back together give the brass crimps a clean.

Get the scooter off the ground, as the engine needs to drop out from under the scooter. As I dont have any help this is how I do it.

These are all the parts I needed to remove to get the engine out, as well as the rear shock bolt that is not shown here. So it's all the cables disconected (clutch, choke, brake, gears and accelerator. Rear shock and main engine bolt.

The engine then drops out of the bike. Its a heavy lump so take care when you take out the engine bolt.

With the engine on the benchtake off the cylinder cowl and the four nuts that hold the cylinder head on.

Remove the cylinder head and then the cylinder,

The piston is then exposed. Remove the piston by taking out the ring clips each side of the gudgeon pin and pushing the gudgeon pin out. Mine came out with mild resistance. If it is tight in there, it is advisable to by a tool for the job. Do not hit it with a drive and a hammer as this could bend the crank.

To fit the new piston it is just a reverse of what I just explained but ensure the arrow on the piston crown points to the exhaust. Use new gaskets at the base of the cylinder and also the head.

 Whilst I had the engine out I replaced the engine mounts (silent blocks) and also the rear shock mount rubbers as they are cheap and I had never changed them before. I also replaced the rear shock for a new one as I'm pretty sure the one that was on was original from new so 48 years old. I also changed the front shock as that was definately dead. As the fuel tap was original and I could see some debris in the tank I elected to change that also. And you can see in the picture the tyre is worn, a new one was fitted.

 With the engine back in the bike (sorry no pictures) the engine started no problem at all and even starts first time now. I have fit the new 20/20 carb and jetted it as a standard 150cc vespa  and will adjust this accordingly as I ride.

 Be mindful to run the new cylinder in, I will keep the revs low for around 150 miles and use a 3% two stroke oil mixture before I am confident of giving it a bit more stick.

Create your website for free! This website was made with Webnode. Create your own for free today! Get started